Sunday, September 30, 2012

Some fine tuning

The task of the day was to get everything lined up, ready for final fairing and then skinning.

According to the Barlow plans. you should be able to run a straight edge, positioned thwart-ship, from stem to stern, and make fair contact with both chines and the keelson the entire way. I had a few spots that were rather off, and needed some correction.

So, I made some tweaks to the location of the chine notches (the things that hold them in position). One of them in particular needed to be raised almost 3/4". I guess that flare form got knocked out of level somewhere along the way. No worries. That's one of the cool things about building the jig this way...you can adjust it easily later.

There were a couple of spots where I needed to raise up the keelson. I found that wedging some roof flashing between the keelson and the strongback did the trick:


And there were some spots where the keelson needed to be brought down a bit. I used Spanish windlasses for that, and found that I could attach one to either side of the keelson to adjust it for level as well.

After quite a bit of that sort of thing, it is in pretty good shape. You can't tell from this shot (compared to earlier shots from a similar angle), but this thing is about dead-nuts perfect right now:


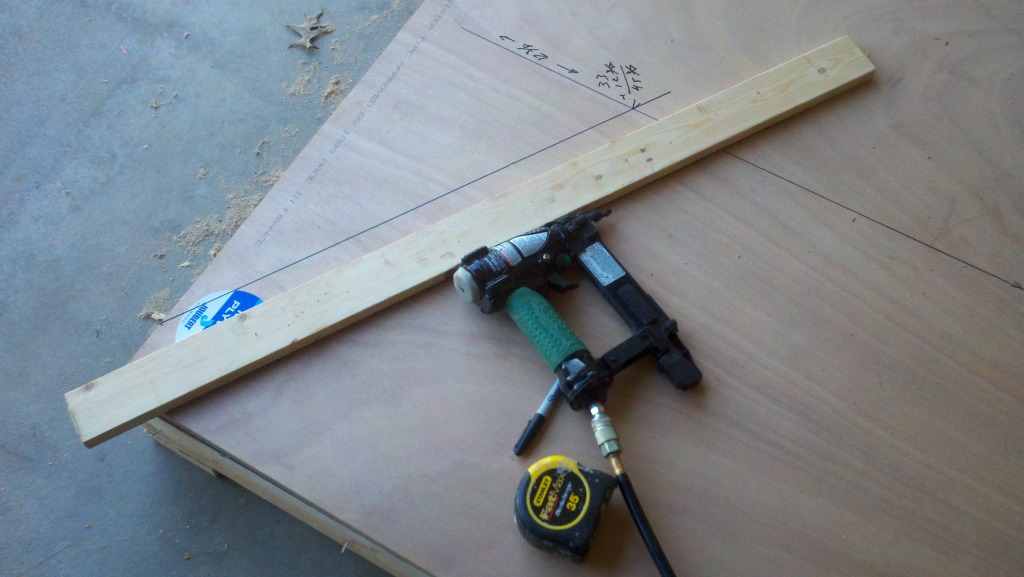
There are still a few points along the chines, particularly toward the bow, where the bevel needs to be adjusted. I put together this fairing board to handle that:


Once the epoxy sets tomorrow, I'll glue some sandpaper to the bottom and have at it. I'm also hoping that that board will help me do a neat job of fairing the hull. I'm planning on painting it dark blue with a gloss finish, which I expect is going to be pretty unforgiving of anything less than perfect smoothness.

I also decided that the Spanish windlasses that I used to pull the chines down at the stern were no longer necessary now that the joints are cured. I went ahead and pulled them off, which let me get the belt sander onto the chine blocks and clean them up a bit from the gluing. They came out pretty nice:


Last task for the day was to make my scarfing jig. I got it put together, but I think I'm going to do it over. I calculated my required angle at 8.5 degrees, but I don't think that is sharp enough. I am going to re-do it at 11 or 12 degrees, which I think will give a cleaner result.


If I can get that done tomorrow night, along with the final sanding/fairing of the chines, I should be scarfing the sides on Tuesday and installing them on Wednesday.


Saturday, September 29, 2012

Ready for fairing

After a couple more days of work, Seven Wonders is ready for pre-skin fairing.

First, a bit about the technique I worked out for creating Spanish windlasses.

You start by screwing a pipe hanger onto the board that needs to be pulled into position:


Next, you have to decide what direction the board needs to move. In this case, you can see that the chine is already sitting nicely on the notch board, but there is a horizontal gap between the chine and the outside edge of the flare form. The Spanish windlass will therefore need to pull horizontally to achieve the alignment we want.

Next step is to find a suitable location on the jig to install the eye cleat:

I drill a pilot hole, then screw it securely into place.

Now, get your wire. I bought a spool of 14 gauge wire at Home Depot.

I loop the wire through the pipe hanger, then measure it for rough length so that both ends end up four inches or so longer than is needed to reach the eye cleat.


Then I take a ViceGrips, grab one of the loose ends, pull it reasonably tight, and then fasten it around the wire by giving it a few wraps.


I will end up looking like this.


Then I grab the other end with the ViceGrips, and wrap it around the wire as well.


You will end up with this.


I've installed a dozen of these now, and never had one pull loose.

Next, all you need to do is take a spike and wind the windlass tight.


I bought the biggest spikes I could find at HD. They were only $0.60 ea, and it makes it a lot easier to crank these down when you have some good leverage.

Crank it down tight, keep an eye on the board you are trying to move, and presto! Perfect alignment. The wire seems to take a set, so there is no problem with the windlass trying to spring back. Just turn it a couple of turns beyond what you need and it will stay in place.


Now for the boat: I got the ends of the chines glued into place last night. Cutting the chine support blocks was a trick. The angles on those gets pretty extreme, particularly on the bow end. It took a bit of trial and error to get those in place. I ended up deciding that "good enough" was good enough, and relying on thickened epoxy to fill in the gaps. Here is the starboard side stern joint:


And the port side bow joint:


Somehow, I got off on the port side stern joint, and ended up with a big epoxy filler to make it fit. No worries. This is going to be plenty strong:

I'll sand off all the excess in the process of fairing the boat. With a bit of cleanup on the inside, I think those joints/blocks are going to come out fine.

Here are a few shots of the overall boat prior to fairing:


For the most part, everything has lined up pretty well. There is a spot in the middle where the keelson is standing a bit proud. I think some windlasses on the keelson will pull it down into position. If not, I'll sand off a bit on the keelson so everything is flat side to side.

Torturing the chines into place was tough. The bend at the bow end was pretty severe. What I found was that I needed to clamp the chine in the middle of the boat, then use a windlass to pull the bow end down into position. This was before I put the chine blocks in place. After the chines were lined up, then I carved the blocks and epoxied them in.

In contrast, for the stern I made the blocks and installed them, then used windlasses to pull the chines down tight into the blocks.

Those ends were by far the trickiest part of the project so far. Glad they are done!


Thursday, September 27, 2012

Our Ladies of Spain

Checking out yesterday's work, it appears the chines have glued up just fine. Tonight's task was to start getting them properly mounted to the jig to prepare for skinning the hull.

First step was to lower the flare form extensions:

These were previously installed flush to the top of the flare forms in order to facilitate laminating the chines. Now they will serve as a notch to hold the chines in position. I made a little block of "chine" to assist in positioning these extensions:


Next came the task of actually getting one of the chines in position. This was somewhat daunting at first.

Cutting it to length on the ends was pretty simple. A few quick swipes with my pull saw and it was set. I had marked it yesterday flush with the transoms, but as I see it, there is almost nothing structurally important about gluing the end grain of the chines to the transoms, so I cut them just a tad short and figure I can slather the joint full of epoxy.

Since I started this project, I've been interested in reading all this talk in the Barlow instructions about "Spanish Windlasses". Somehow, that struck me as a kludgy thing to do...after a skilled craftsman such as my self will do such a masterful job of making the chines that they will lay easily and effortlessly right in their notches, with virtually no clamping required.

Wrong.

I am now in love with Spanish Windlasses.

Took a little trial and error to get them sorted out, but after a bit of struggle, I ended up with a bunch of these beauties:


I'm sorry I ever doubted you! Those things are slick!

What put me off was the prospect of drilling holes in my lovely chines (see the copper pipe hanger on the right?). But I realize now that a dab of epoxy will clean it up just fine, and they work beautifully.

Got most of the starboard side finished tonight. Should have the port side finished tomorrow. Saturday we scarf the sides and Sunday, maybe, just maybe we can start skinning!


Wednesday, September 26, 2012

Installing the transoms, laminating the chines

I got the transoms epoxied on last night. No real drama there. Just another one of a seemingly endless number of three-handed jobs on this project. 

The plans call for the transoms to be rigidly mounted to the jig somehow. I guess that makes sense...you don't want them moving as the chines and planking are installed. So I decided the easiest way to do that would be to get some tapcon screws and lag a 2x4 into my garage floor at both ends, then get some deep C-clamps, clamp some 2x4's to the transoms, and then screw them to the floor board. Worked out pretty slick:


Harbor Freight is the salvation of this project. If you want to get lots of clamps and get them cheap, that's the place to go.


The next step for tonight was to get the chines laminated. Here's a shot of me testing out my clamping strategy:


There is a pretty severe bend on those toward the bow...in both directions (in and down). I had a tough time figuring out how I was going to clamp them to the bow transom when it occurred to me that I could just screw them into the side (of the transom) with some deck screws. Worked perfectly. I've got a similar trick in mind for tomorrow when I install the chines permanently.

For now, I have them laminated and the glue is curing. That was a hot mess of a job, but they seem reasonably fair as they sit, and I'm pretty confident they can be tortured into their final position without too much drama.

I did discover my first "oops" on the project: The bow transom is level, but the lower (as the boat will sit in the water) corner on the starboard side is about 3/16" closer to the boat (as measured to the first flare form) than is the corner on the port side. I think that's why the starboard chine fought me more than the port. In any case, it doesn't seem like its worth worrying about, and I'm not sure what if anything I could do at this point anyway. So if Seven Wonders wants to always sail in circles, now you know why.


Monday, September 24, 2012

Finishing up the transom cheeks

Pretty easy night tonight.

The objective was to get the remaining cheeks attached to the bow and stern transoms so I can get them sanded smooth and installed tomorrow.

The first step of the night was to finish dressing the keelson. I sanded off the transom knee repairs from yesterday (turned out fine), sanded the edges smooth, and cleaned up the gunk on the inside (the visible side)  as well. Came out fine.

Next, I wanted to ensure that I had the keelson placed perfectly correct on the jig. The plans call for the bow transom knee to be exactly 11" from the first flare form. Turns out I had it a tad short before, so I cut off about an inch from the stern end of the strongback and slid the entire keelson forward until it was perfectly on the mark. After clamping it down along the length of the jig, the keelson is now in its final location until the hull gets pulled from the jig.

Time to dry-fit the transoms. A clamp was enough to hold the bow in place, which allowed me to drive one screw very close to the keelson, and then make whatever minor adjustments I needed to make sure it sat level.

Sorry about the quality of these pics. It was dark and there was very little light coming in from outside the garage.


Dead nuts level:


The stern was more difficult. I couldn't get a clamp to hold it in place, so I ended up stacking some odds and ends on the floor to prop up the transom until I could get my starter screw in place. Once that was set, the rest was easy.

In doing both, I realized that the keelson wants to "rock" a bit on the jig. I corrected that by applying a clamp to one side or another to pull it down level (port to starboard, as it were).

Once both ends were in place, I was able to cut the cheeks to final size. I decided to get a wee bit fancy and applied a radius to the inside corner to dress it up a bit. Careful observers will note that that radius corresponds precisely to the size of the head of my rubber mallet.

I had initially contemplated carefully carving the cheeks so that they ended up flush with the transom knees as well as the keelson. It didn't take a lot of thinking-chair time to conclude that the juice wasn't worth the squeeze on that one. Rounding them off is as dressy as they are going to get.


Getting more and more confident with the epoxy with every passing day. I had good luck with the "fast" hardener again tonight. First I mixed a batch clear, and brushed it on the mating surfaces, then I squirted in another batch to what was left in the cup (not much) and mixed in a bunch of wood flour to thicken it up. Smeared that on the mating surfaces and screwed the boards down. Pre-drilling the holes and marking the position of the boards makes alignment all but automatic.

Things were rolling right along, and I thought about going ahead and installing the transoms tonight. I thought the better of it, though, when I considered that I am going to want to sand those cheeks smooth before painting the inside of the boat. That's going to be a lot easier to do tomorrow than it will after the transoms are installed. 

So I waited. But it was kind of hard. I have to say, it was pretty cool looking at the boat with both ends dry-fit into place. Really made the shape start to appear. I had a good conversation with Lou Brochetti today, going over a bunch of details for the coming steps. I think now it is realistic to think that I'll get the sides on by the weekend, and the bottom on by the end of next week. Can't wait to see this thing really show its form!


Sunday, September 23, 2012

Slow day

Never mind that it seemed like I was at it all day, in the end I don't feel like I made a lot of progress. One thing I'm figuring out is that when you are working with epoxy, you can only work so fast: The thing you worked on last has to cure before you can work on it again, and that takes time.

Today's goal was to get the excess length on the keelson trimmed off, and to get the cheek pieces attached to the bow and the transom.

First "oops" of the day was actually an oops from yesterday. It didn't occur to me that the squeeze out from laminating the keelson would run down into the jig and fasten down the keelson. Had to break that off. There are a couple of spots on the inside face (the side that is going to show in the bottom of the boat) where the plywood got munged up a bit. No worries. I'll get to that in a minute.

Of course, when trimming off the excess length, I managed to botch both ends of the keelson. I thought I was being careful, but ended up running the circular saw through the transom knees on both ends. Oops. Spent a few minutes in my thinking chair before I realized I could fix the mistake by buttering them up with thickened epoxy. The result looks like this:


and this:


The stern got the worst of it. I used the "fast" hardener on the epoxy, but its still not ready (four hours later) for sanding, so I'll do that tomorrow. I'm pretty sure that after I sand down the epoxy, things will work out just fine.

This was my first test using thickened epoxy as well. After I mixed it up, I added a bunch of wood flour (actually, sawdust from my belt sander collection bag) until it had a consistency somewhere between catchup and peanut butter. I think that worked out pretty well.

And I used some of the same batch of thickened epoxy to spread over the wounded parts on the inside face of the keelson. I'll sand those smooth tomorrow as well.

Next task was to cut and attach the cheek pieces on the transoms. This involved taking some of the 1" lumber I planed down a couple of weeks ago, and cutting it, beveling it, and epoxying them to the bow and stern.

Just missed a near disaster here. On the bow, I was just about to glue them up when I realized I had sized everything to the outside of the boat, not the inside. Glad I caught that when I did. As it stands, the cheeks are a little shorter than they should be, but I think that's going to be ok. Worst case is I have to make up some filler blocks, but I think the curve of the top of the boat will take care of it. 

You can see what I am talking about here in this shot. In a perfect world, those side pieces would extend all the way to the bottom of the plywood (which is actually the top of the boat).


Here is the stern:

What I did on each of these is carefully position the cheek pieces that will be on the bottom of the boat, but not attach them. I need to wait until I position both the bow and the stern, then carefully carve those pieces around the keelson and the transom knees. Accordingly, I've got them cut, but kept them a bit long so I can fine tune them later before finally gluing them on.

Getting more and more comfortable working with the epoxy as well. For these joints, I spread some standard  mix on both surfaces, then went back over it with another mix that had been thickened to catchup consistency with wood flour. After I had the pieces glued and screwed in place, I added more wood flour to make a heavy paste and smeared it in the screw holes. Those should sand smooth and fair tomorrow.


Saturday, September 22, 2012

Laminating the keelson and cutting the transoms

Had a productive session this afternoon after getting the trailer sorted out.

First, I needed to get the two layers of the keelson laminated together. That started with marking and cutting off the ends of the strongback so that it clears the transom knees.


Next I did a dry fit, mainly to make sure my clamping strategy was going to be able to pull the lamination tight and down flush to the strongback.


From there, it was just a matter of mixing up a bunch of epoxy, slathering a bunch on both sides of the lamination, and positioning it together. I put my clamps back in place first, then went down the line, starting at the bow, and added 3/4" stainless screws every ten inches or so.


Everything seemed to come out fine. Since I used "slow" hardener, I expect that it won't be cured until tomorrow afternoon.

Next, I wanted to get the transoms cut and beveled. This was another gut-check, since that piece of 3/4" Joubert cost over $150 by itself. I didn't want to screw it up.

I started by marking out all the cuts. Duke took more interest in that process than I would have preferred. 


I figured it would be easier making the cuts down on top of the crate bottom (which I have been using for a cutting board for a while now). I took a piece of straight 1x4 and used my brad nailer to tack it onto the board. Turns out the offset for my new saw is exactly 1.5" proud. Because I need to get other pieces out of this board, I couldn't run the cuts all the way through, and needed to use my jig saw to finish in the corners.

Next thing you know, the bow and transom are cut out. That's Anthony, the neighbor kid from across the street. He has taken quite an interest in the project and comes over whenever he sees me out working.


The next step was to bevel the edges of the bow and transom. Out of a total of six cuts, five were fairly easily done with the circular saw and a guide board.


Unfortunately, the last one is at too sharp of an angle, so the only way to do it is to pass the board vertically over the table saw. This has got to be about the most awkward thing I've ever done, but it worked out, and the bevels are all set.


The Eagle Has Landed

Or, at least the trailer.

This morning's project was to pick up the trailer cum boat, dump the boat, and keep the trailer.

Here's how it looked up close for the first time:

First problem we encountered is that the previous owner scavenged the winch off the trailer. Oops. Found some electrical wire in the boat and lashed the boat to the roller and crossed our fingers...


Drove slowly for a mile or so until we made this gas station. The tires, while mis-matched (one side has a temporary spare tire held on with three out of five lug nuts) seemed to be holding air, and our electrical wire lash job seemed to be holding.


There was an Evinrude outboard sitting inside the boat. I pulled the starter cord and the motor is not frozen, so I figured it might be worth keeping or selling. Made a stop at home to drop it off. I'll figure out what to do with that later.

Off to the landfill. The masher-guy in the bulldozer made a bee-line for us. I think crunching up boats is a rare treat for them.


He helped us pull the boat off the trailer with a cable...


 Which of course slipped off a few times...


But we eventually got it on to the ground.
 

Its kind of sad seeing it sitting there. I wonder how many happy hours of family fun that boat delivered over the years.


Well, those days are gone now. As soon as it was off the trailer, the bulldozer guy couldn't wait to crunch it up...


And just like that, the Larson is no more. The sound a boat makes when it is being crunched into splinters is oddly satisfying.

On the way out of the landfill, they reported our net weight difference at 1140 pounds. I guess that sounds about right for the old tub. Cost me $20 in landfill fees. Add to that the $50 I gave for the boat/trailer, and the $20 in gas I put in my friend's truck, and I'm still in this thing for less than $100, pre restoration costs. Not too bad.


In the end, here's what I was looking for. The trailer is back at my shop, awaiting some minor mechanical restoration and a paint job.


I'm going to give her new wheels and tires, new bearings and (wasn't counting on this) a new winch. The good news is the lights and wiring seem to be ok. I'll re-do the plug end and put on one of the new round kind. It has the old four-prong flat kind now. I've got a couple of months to figure out how to reconfigure the bed for the Pelican. I think I'll just remove the roller assemblies, and fabricate some bunks out of PT lumber. Or maybe I'll see if my brother in law the welder can weld in some brackets for the bunks. Or maybe I'll see if there are commercially available bolt-on brackets I can get for that. Either way, I need to finish the boat first.